Retrofitting Underfloor Heating in Old Buildings
Living in an old building, heating in a modern way
In recent years, the topic of heating has become significantly more important. While demand for heating comfort is growing, energy costs have also risen rapidly. This is why the demand for new heating systems is usually for systems that are comfortable, energy-efficient and environmentally friendly.
Although 80–90% of new detached and semi-detached houses have radiant heating systems, particularly water-based underfloor heating, the response to the challenges of the energy transition has been much more cautious in existing buildings. Old buildings are characterised by high ceilings, large windows and wooden floors. While these features contribute to a high level of living comfort, they can result in disproportionately high heating costs when wood and coal stoves are replaced with gas or oil heating systems, especially since thermal insulation in old buildings is usually inadequate.
While there are many arguments in favour of installing ceiling or underfloor heating in old buildings, many owners are put off by the high cost of replacing the entire heating system. FLEXIRO's low profile underfloor heating offers a solution that increases heating comfort and saves energy costs room by room without replacing the central heat source.
Does it make sense to retrofit underfloor heating without replacing the heat source?
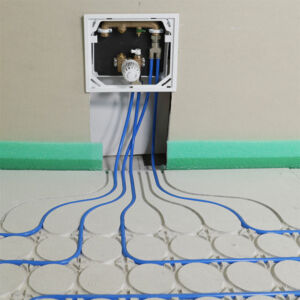
How can the comfort of underfloor heating be retrofitted in existing and older buildings if investing in a heat pump is not an option? The FLEXIRO solution makes it possible to implement radiant heating in existing buildings step-by-step. The heating kits can be installed specifically in rooms where thermal comfort is particularly important. It is not necessary to replace the heat source. The connection can also be made to heating systems with high flow temperatures using return temperature limiters. Depending on the design, the cost of underfloor heating ranges from €75/m² to €175/m² if you do the installation yourself.
Retrofitted underfloor heating can either replace existing radiators or, in cases of poor thermal insulation, be operated in addition to the radiators. This allows the thermal comfort of underfloor heating to be retrofitted in older buildings and prepares the heating source for modernisation by introducing radiant heating gradually. Once the heat source has been replaced, the previously retrofitted heating surfaces can be connected and controlled via a heating circuit distributor.
calculate
Calculation of the heating surface
Depending on the room conditions and heating requirements, a heating surface of 60 to 85% of the room area should be planned for underfloor heating.
Kitchen units or other storage areas should be left out during installation. For example, 10 m² of underfloor heating can provide sufficient heat for rooms between 12 and 16 m².
What makes low profile underfloor heating so attractive
FLEXIRO underfloor heating has a minimum installation height of 17 mm. This low-profile system can therefore be retrofitted onto existing flooring. Whether installed directly onto floorboards or existing screed, its flat design reduces installation costs. In some older buildings, the installation height is the same as the door threshold height. High-quality parquet flooring can then be laid over the underfloor heating.
Installing the 10 cm thin heating pipe in tight loops directly under the floor surface enables excellent heating performance and rapid heating-up of the system. Even heating of the floor allows the radiant heat effect to be fully utilised.
This is how to install underfloor heating with studded panels
Installation on OSB, on plasterboard, with clip rails or studded panels?
Plasterboard
add_circle
Installation in drywall construction using milled Fermacell gypsum fibreboards enables a quick and clean process. The handy size of the boards allows the heating surface to be adapted to most room geometries. The low layer thickness of the filling compound significantly reduces the drying time and contributes to the overall very short installation times. The floor covering can be laid the very next day. The screed panel is load-bearing, moisture-regulating, resistant and non-combustible.
highlight_keyboard_focus
The milled dry screed panels require a level and stable substrate. The manufacturer Fermacell recommends a multi-layer structure for non-load-bearing floor constructions. The cost per square metre is comparatively higher for the dry system. Edge panels must be cut to size yourself.
OSB-Board
add_circle
OSB boards are a popular choice of material for interior construction. The wood fibre board is robust, easy to handle, moisture-resistant and heat-retaining. The milled structure reduces the amount of levelling compound required and thus the weight load from the underfloor heating. Installation is quick and the heating is ready for use after 1-2 days. OSB enables drywall construction at a comparatively low cost.
highlight_keyboard_focus
When laying with OSB boards, an additional adhesive primer must be applied. An uncoupling mat is also required. When using on wooden beam ceilings and other floors that are not load-bearing, a multi-layer structure must be planned to ensure sufficient stability and load-bearing capacity.
Clip rail
add_circle
Mounting underfloor heating with clip rails is particularly recommended for retrofitting on uneven surfaces such as wooden floors. Clip rails allow for a low installation height and are also the most cost-attractive installation method.
highlight_keyboard_focus
The installation effort is slightly higher than with drywall variants. In some cases, the loops of the heating pipes must also be fixed to the floor with dowel hooks. Otherwise, the pipes may not lie flat on the floor, which will require additional grouting compound. This would increase costs and installation height. Installation with clip rails requires the most levelling compound.
Studded plate
add_circle
If the subfloor is even and smooth, the heating pipes can be fixed close to the floor using studded panels. Studded panels simplify the installation of the heating pipe and require less levelling compound. This saves costs and reduces the response time of the underfloor heating. Studded systems allow you to choose any installation design you like.
highlight_keyboard_focus
The existing floor must meet the requirements for full-surface bonding of the studded panels. Unevenness and residual moisture have a negative effect on the adhesion of the panels.
Underfloor heating systems
question_exchange
Both installation methods allow for the safe and rapid installation of a low-profile underfloor heating system. Whether installing using clip rails or studded panels, it is essential to ensure that the subfloor has sufficient load-bearing capacity beforehand.
Clip rails are screwed to the subfloor and can accommodate unevenness, such as that found in wooden floors. Studded panels allow for flexible installation patterns and reduce the need for levelling compound. Here are the specific advantages of the installation methods in detail:
| Clip-on rail | Studded panel |
| Most cost-effective, simple installation method | The higher costs are partly offset by the reduced need for levelling compound |
| Tolerates uneven floors | Requires a level and dry substrate |
| Fixed with screws | Fixed using adhesive. In addition, a reinforcement mesh is pre-fitted underneath the studded panels at the factory |
| Medium drying time | Short drying time |
| Installation pattern: Meander | Laying pattern: Maximum flexibility. Spiral laying is also possible. |
| Additional dowel hooks are required for tight bending radii | Secure and even support for the heating pipes close to the surface |
The function of heat distribution plates is clear from their name. Thanks to the excellent thermal conductivity of the materials used – usually aluminium or galvanised steel – the plates transfer heat from the heating pipes to the floor surface. This ensures even heat distribution and minimises thermal bridges between the pipes. The use of heat conduction plates increases the energy efficiency and response speed of the underfloor heating system. The required thermal comfort is achieved at a lower heating water temperature, which offers further energy benefits, particularly when used in conjunction with heat pumps.
Heat conduction plates are mostly installed in combination with dry-build systems, as the materials used here, such as gypsum fibre, polystyrene or wood, have lower thermal conductivity compared to wet screed. In standard wet screed systems using screed concrete or cement screed as the casting compound, heat conduction plates are rarely used, as the concrete handles the heat distribution.
Heat conduction plates are also unnecessary for low profile underfloor heating systems, as the thin pipes used here can be laid at close intervals. Furthermore, laying the pipes close to the surface ensures direct heat transfer into the room via the floor covering.
These are the reasons why the thin-bed heating system is effective even without heat-conducting plates
Wet installation
Our 10 mm systems use special studded panels or clip rails to secure the pipes. This ensures that the heat-carrying pipes are fully enclosed by levelling compound. The levelling compound acts as a heat-conducting layer and ensures heat transfer directly to the floor covering. For these reasons, we also recommend using a levelling compound specifically designed for underfloor heating systems to embed the pipes in our OSB and dry screed systems.
Tight installation spacing
Due to the flexibility of the thin PE-RT pipes, which allow for small bending radii, they can be laid at tight intervals of 10 cm or less. As a result, the temperature difference at the floor surface between two pipes is so small that no metal plates are required for the cross-distribution of heat
Potential air pockets
Heat-conducting sheets can be problematic in very thin floor constructions. If the pipe does not fit perfectly within the sheet, insulating air pockets can develop, which have a negative impact on heating performance. In thin-layer systems, the direct bond between the pipe and the grouting compound is crucial for stability and heat conduction.
Acoustic risks
If heat-conducting plates are not absolutely firmly bonded to the pipe, they can expand when heated and cause noise (cracking).
If you have any project-related questions regarding the use of heat conductive plates, please feel free to contact our technical support team.
We are often asked how much it costs to retrofit underfloor heating per square metre. Before answering this question, we first enquire about the initial situation. How many rooms are to be retrofitted? How large are the heating surfaces? What is the condition of the floor? When was the house built? Is there thermal insulation? Is there a heating load calculation? Can the installation be carried out by the customer?
With the information on the initial conditions, we can suggest a suitable underfloor heating system and thus specify the costs for the heating technology.
However, the costs for retrofitting underfloor heating also include the costs of installation, the expenses for construction chemicals and, if necessary, for the disposal of the old floor. Our tips on cost calculation explain exactly which cost items need to be taken into account here.
For structural calculations in the run-up to a house modernisation, it is sometimes necessary to know how much weight the underfloor heating will put on a floor. Of course, the weight depends on the individual floor structure and the materials used. Nevertheless, the weight of the FLEXIRO components can be calculated.
The levelling compound accounts for the majority of the total weight. The specific weight of a levelling compound is typically between 1.6 and 1.8 kg/m² per 1 mm layer thickness. With a construction height of 17 mm, an estimated weight of approx. 26 kg/m² can be expected. The underfloor heating itself adds only approx. 1.9–2.2 kg/m², even when filled with water. Therefore, the thin-layer system is much lighter than a standard underfloor heating system where the heating screed must be included in the calculation.
The minimum coverage for the heating pipes is 3 mm. However, the required layer thickness depends on the flooring material selected. The minimum layer thickness is only recommended for tiles and ceramic materials. Other flooring materials require an additional 5 mm of coverage. The levelling compound must be flexible and bear the manufacturer's mark indicating suitability for thin-layer underfloor heating. To ensure optimum heating and cooling performance, apply the levelling compound as thinly as possible. Precise information on the thermal resistance of standard floor coverings can be found in our underfloor heating technical sheet.
